Onboard a Validator
Introduction
Setting up a Glue validator node is essential for securing the network and earning staking rewards. This guide walks you through the technical steps to set up a validator, from installing the necessary software to managing keys and synchronizing your node with the chain.
Running a validator requires a commitment to maintaining a stable, secure infrastructure. Validators are responsible for their own stakes and those of nominators who trust them with their tokens. Proper setup and ongoing management are critical to ensuring smooth operation and avoiding potential penalties such as slashing.
Prerequisites
To get the most from this guide, ensure you've done the following before going forward:
- Read Validator Requirements and understand the recommended minimum skill level and hardware needs
System setup
Before you can begin running your validator, you'll need to configure your server environment to meet the operational and security standards required for validating. Configuration includes setting up time synchronization, ensuring critical security features are active, and installing the necessary binaries. Proper setup at this stage is essential to prevent issues like block production errors or being penalized for downtime. Below are the essential steps to get your system ready.
Install Network Time Protocol Client
Accurate timekeeping is critical to ensure your validator is synchronized with the network. Validators need local clocks in sync with the blockchain to avoid missing block authorship opportunities. Using Network Time Protocol (NTP) is the standard solution to keep your system's clock accurate.
If you are using Ubuntu version 18.04 or newer, the NTP Client should be installed by default. You can check whether you have the NTP client by running:
timedatectl
If NTP is running, you should see a message like the following:
System clock synchronized: yes
If NTP is not installed or running, you can install it using:
sudo apt-get install ntp
After installation, NTP will automatically start. To check its status:
sudo ntpq -p
This command will return a message with the status of the NTP synchronization. Skipping this step could result in your validator node missing blocks due to minor clock drift, potentially affecting its network performance.
Verify Landlock is Activated
Landlock is an important security feature integrated into Linux kernels starting with version 5.13. It allows processes, even those without special privileges, to limit their access to the system to reduce the machine's attack surface. This feature is crucial for validators, as it helps ensure the security and stability of the node by preventing unauthorized access or malicious behavior.
To use Landlock, ensure you use the reference kernel or newer versions. Most Linux distributions should already have Landlock activated. You can check if Landlock is activated on your machine by running the following command as root:
dmesg | grep landlock || journalctl -kg landlock
If Landlock is not activated, your system logs won't show any related output. In this case, you will need to activate it manually or ensure that your Linux distribution supports it. Most modern distributions with the required kernel version should have Landlock activated by default. However, if your system lacks support, you may need to build the kernel with Landlock activated. For more information on doing so, refer to the official kernel documentation.
Implementing Landlock ensures your node operates in a restricted, self-imposed sandbox, limiting potential damage from security breaches or bugs. While not a mandatory requirement, enabling this feature greatly improves the security of your validator setup.
Increase network connection pool limit
We can check the limit with
sysctl net.netfilter.nf_conntrack_max
and the actual usage with
cat /proc/sys/net/netfilter/nf_conntrack_count
and check that we are not close to the limit.
Read more about conntrack.
Synchronize a node
The next step is to sync your node with the blockchain network. Synchronization is necessary to download and validate the blockchain data, ensuring your node is ready to participate as a validator.
We need a synchronized full node. To achieve this follow Setup relaychain node and make sure that
- you use
--pruning archiveargument as in the givendocker-compose.yml, - you add an additional
--validatorargument that tells the node to try authoring.
Bond GLUE
Once your validator node is synced, the next step is bonding GLUE. A bonded account, or stash, holds your staked tokens (GLUE) that back your validator node. Bonding your GLUE means locking it for a period, during which it cannot be transferred or spent but is used to secure your validator's role in the network.
Once you're ready to bond your GLUE, head over to staking page at relaychain->Network->Staking->Accounts Tab, select + Stash button, and then enter the following information:
- Stash account - select your stash account (which is the account with the GLUE balance)
- Value bonded - enter how much GLUE from the stash account you want to bond/stake. You are not required to bond all of the GLUE in that account and you may bond more GLUE at a later time. Be aware, withdrawing any bonded amount requires waiting for the unbonding period. The unbonding period 14 days for Glue mainnet.
- Payment destination - add the recipient account for validator rewards. If you'd like to redirect payments to an account that is not the stash account, you can do it by entering the address here. Note that it is extremely unsafe to set an exchange address as the recipient of the staking rewards
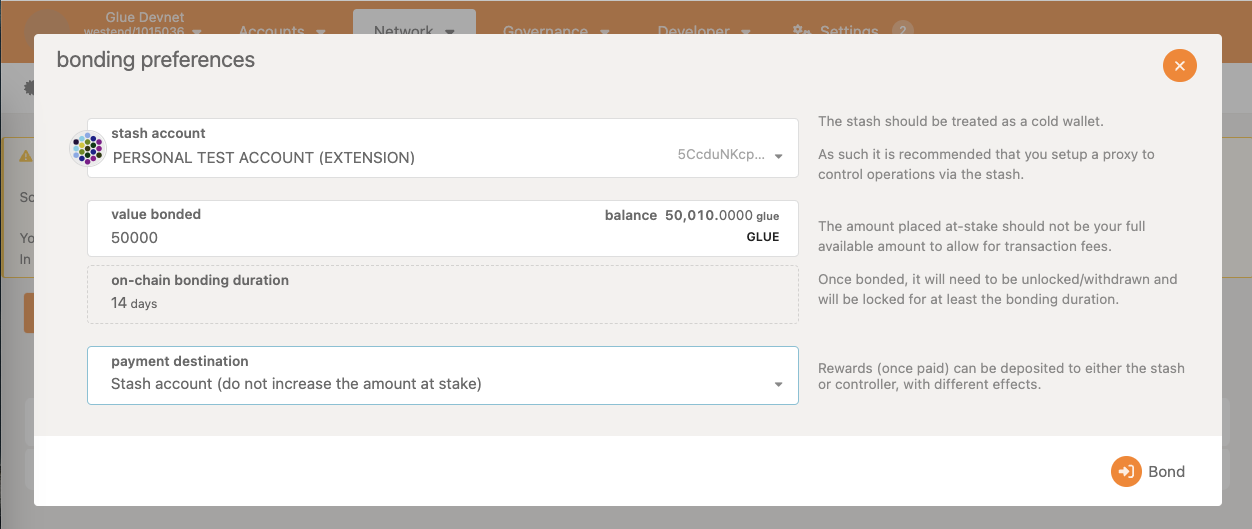
Once everything is filled in properly, select Bond and sign the transaction with your stash account. If successful, you should see an ExtrinsicSuccess message.
Your bonded account will be available under Stashes. After refreshing the screen, you should now see a card with all your accounts. The bonded amount on the right corresponds to the funds bonded by the stash account.

Set Session Keys
Setting up your validator's session keys is essential to associate your node with your stash account on the Glue network. Validators use session keys to participate in the consensus process. Your validator can only perform its role in the network by properly setting session keys which consist of several key pairs for different parts of the protocol (e.g., GRANDPA, BABE). These keys must be registered on-chain and associated with your validator node to ensure it can participate in validating blocks.
The following sections will cover generating session keys, submitting key data on-chain, and verifying that session keys are correctly set.
Generate Session Keys
The UI and the CLI are the two primary methods used to generate session keys. The UI is powered by Polkadot.js Apps since it's compatible with the Glue chain.
- Using UI
- Using CLI
- Select relaychain->Developer->RPC calls->
author.rotateKeys(), - Click Submit RPC call
- Copy and save this hex-encoded output for the next step
Generate session keys by running the following command on your validator node:
curl -H "Content-Type: application/json" \
-d '{"id":1, "jsonrpc":"2.0", "method": "author_rotateKeys", "params":[]}' \
http://localhost:9951
(Use the relaychain rpc port.)
If this request fails, you potentially need to restart the validator with this extra parameter in docker-compose:
--rpc-methods unsafe
Make sure the collator is not exposed to the internet during this time since it imposes a huge security vulnerability.
This command will return a hex-encoded string that is the concatenation of your session keys. Save this string for later use.
Submit Transaction to Set Keys
Now that you have generated your session keys, you must submit them to the chain. Follow these steps:
- Go to the relaychain->Network->Staking->Accounts
- Select Set Session Key on the bonding account you generated earlier
- Paste the hex-encoded session key string you generated (from either the UI or CLI) into the input field and submit the transaction

Once the transaction is signed and submitted, your session keys will be registered on-chain.
Validate
Once your validator node is fully synced and ready, the next step is to ensure it's visible on the network and performing as expected. Below are steps for monitoring and managing your node on the Glue network.
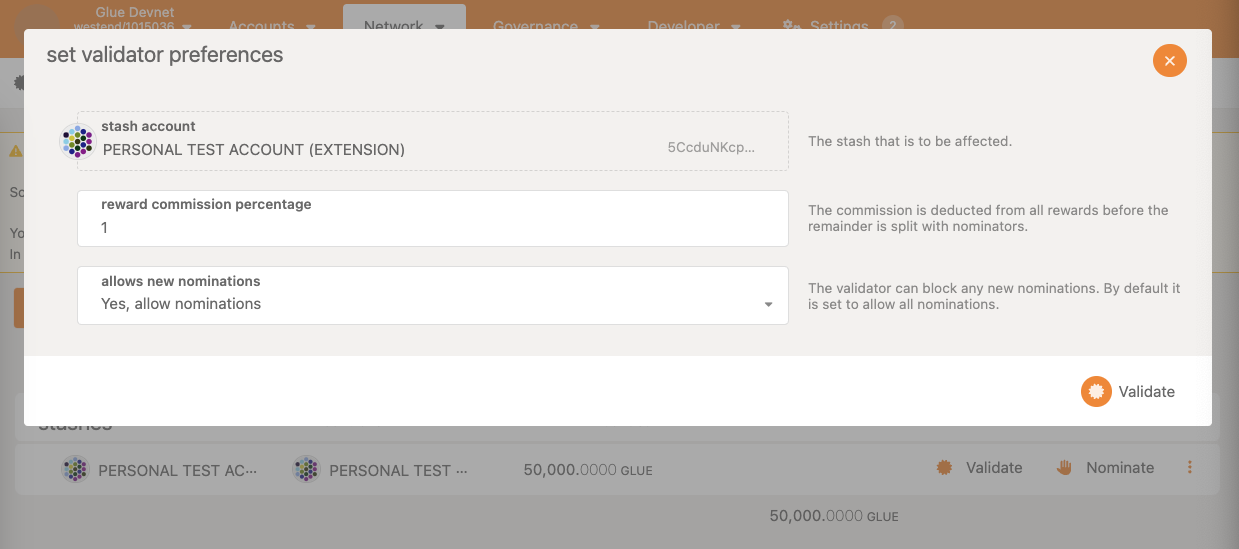
Activate using UI
Follow these steps to activate your validator:
-
relaychain->Network->Staking->Accounts Tab: Press Validate next to you validator.
-
Set a reward commission percentage if desired. You can set a percentage of the rewards to pay to your validator and the remainder pays to your nominators. A 100% commission rate indicates the validator intends to keep all rewards and is seen as a signal the validator is not seeking nominators
-
Choose Yes, allow nominations option if your validator is open to more nominations from GLUE holders
-
Once everything is configured, select Validate to activate your validator status
-
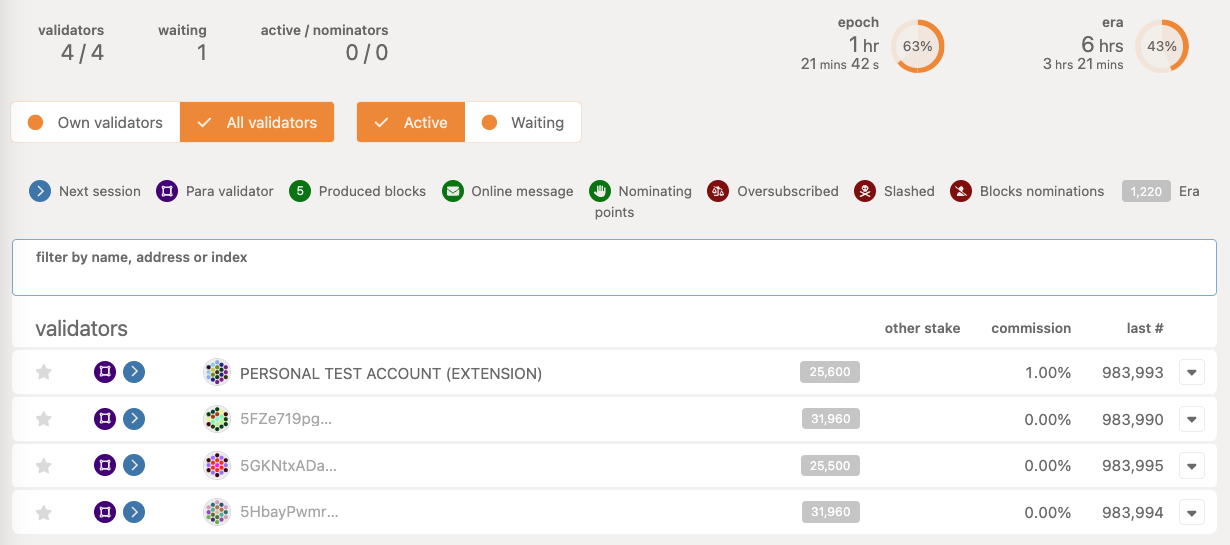
Check that your validator is showing up:

-
Switch to the Overview tab to see your validator's status, the number of available validator slots, and the nodes that have signaled their intent to validate. Your node may initially appear in the waiting queue, especially if the validator slots are full.
The validator set refreshes each era. If there's an available slot in the next era, your node may be selected to move from the waiting queue to the active validator set, allowing it to start validating blocks. If your validator is not selected, it remains in the waiting queue. Increasing your stake or gaining more nominators may improve your chance of being selected in future eras. When the validator is eventually selected, you will find your validator among the active list:
Once your validator is active, it's officially part of Glue's security infrastructure. Congrats!